Project 386 #2: Beeps and RAM and manuals—oh my!
I’m still trying to get the 386 to boot or even show anything on the screen. All it does is beep loudly and continuously no matter what I do (save one thing, but that still doesn’t produce a picture and I doubt the CPU is even coming up in that instance—more below).
The areas that I’ve been focusing on debugging have been:
- CMOS battery
- Power supply
- Video card
- RAM
Resources like this one about AMI BIOS and this forum post have got me mostly believing that the CPU and power setup are good and that the fault is either or both of the RAM or the video card. Regardless, here’s what I’ve tried…
CMOS battery
At first I didn’t even realize that this thing had a battery. I saw mention in the motherboard manual about using either the internal or external battery by setting a jumper, but I assumed that it was referring to perhaps an optional power supply for the whole computer.

I’m used to seeing the nickel-sized “coin cell” batteries that we use today even back to the 90s, so I was assuming that this computer, being older, predated the use of a battery like that. The battery is used to remember the BIOS settings (basically, the hardware configuration, and especially the time and date) even when unplugged or turned off for a long while. Not for thirty years, though!
As it turns out, there is a little barrel-like battery way underneath the mounted power supply, soldered right to the motherboard—that’s the internal battery, used by default, and meant to be charged up when the computer is running. The manual says you can expect a good two years out of it, which would have been fine if we were still in the 80s, but unfortunately these things are known to corrode and take down other parts with them.
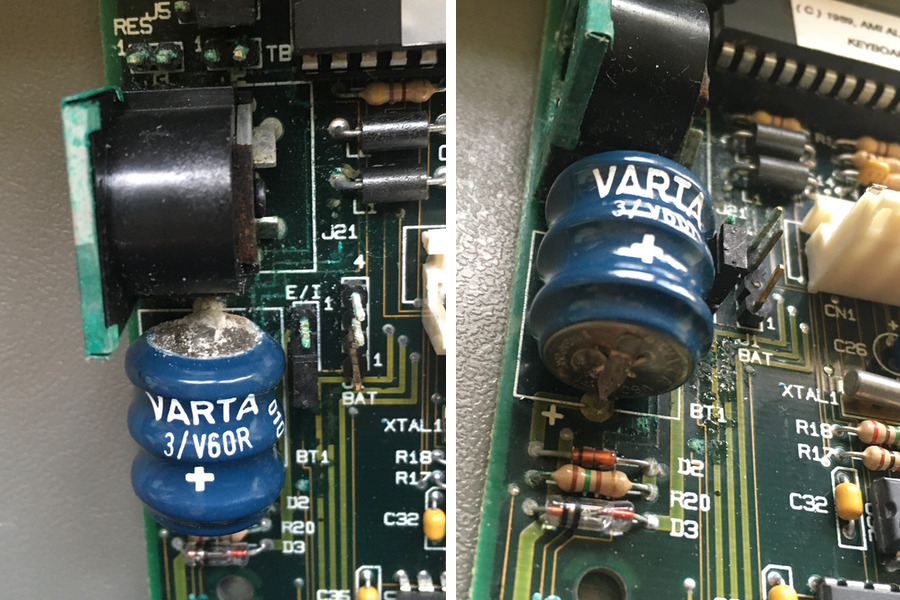
Indeed, this one was slightly corroded and had spread to some other nearby components. I’m getting mixed signals as to whether the thing can boot at all without such a battery, between the manual and posts like this, this, and this that offer conflicting information.
The more I thought about it, the more it seemed likely that this was the culprit. Assuming the computer hadn’t been opened and improperly messed with, other than getting dropped, what else would change over time? Battery corrosion. Everything else seems pretty shelf-stable.
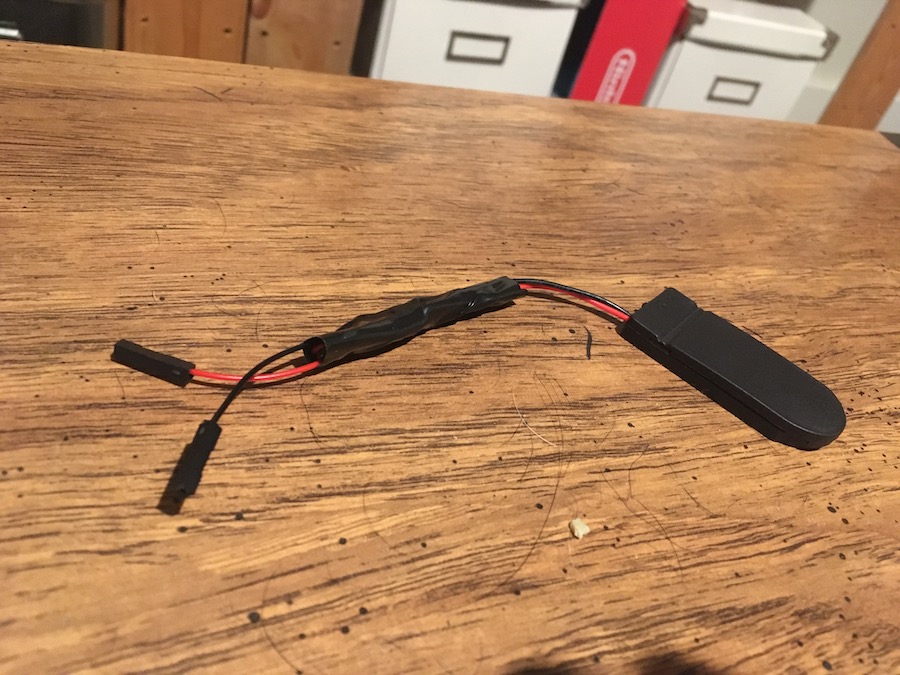
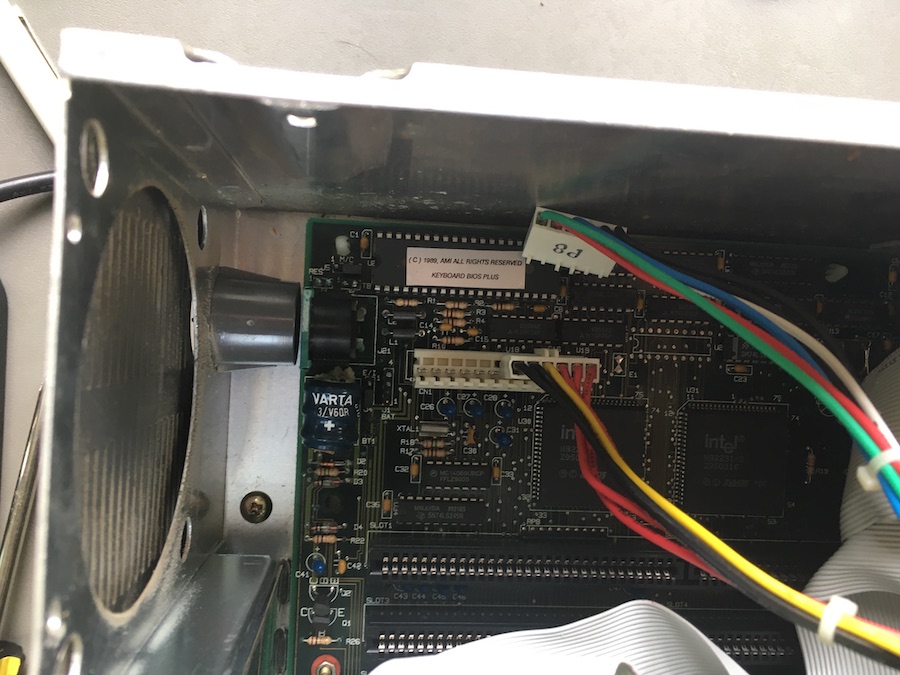
Once I got the original battery out, I rigged up a small, modern, external battery from a coin cell, a dual coin cell holder, some aluminum foil, and some jumper wires. Using the foil, I shorted the spot where the second ~3.2V battery would go, completing the circuit for one battery to give me the nearly 3.6V that are specified in the manual. I can hook this to the jumpers and things should be good to go.
In the end after trying this, however, I doubt that this is what is causing me problems—it stands to reason that as long as the motherboard no longer thinks it should be charging the original battery, it should still boot up fine, even if it can’t remember the time and date. Just seeing a boot screen would be progress, but I was still out of luck.
Power supply
The fan is starting up when the supply is connected to the board, meaning the proper lines are shorted, and I measured all of the +5, -5, +12V, and ground connections to make sure they are properly outputting and connected to each other as appropriate. I doubt the power supply is to blame.
Wikipedia’s article on the AT form factor had a nice rhyme from that era about the appropriate ordering of the two connectors. Although it helps that mine are labeled P8 and P9 so it’s easy to keep them in order, it’s good to remember that “red and red and you are dead”. Keep all the black wires adjacent in the middle, basically.
Bad video card
While I can’t rule this out yet, based on reading on the web, it does seem more likely that bad RAM is to blame as it seems much more common, so I’m not too worried about video being the problem.
One nice thing about this card is it connects to both the internal LCD of the portable case and an external VGA monitor, and with the flip of a switch on the back of the card, you can turn off the internal LCD to save it from any burn-in. I’m unsure if it’s meant to drive both at once, but I would doubt it.

I’m still getting no picture on the LCD and no signal on the VGA port, though, no matter what I’ve done. Combined with the long beep, I’m guessing it can’t even fire up the RAM well enough to get to producing graphics (which themselves would require the use of RAM). So I’m pushing off blaming the video card for now.
Bad RAM
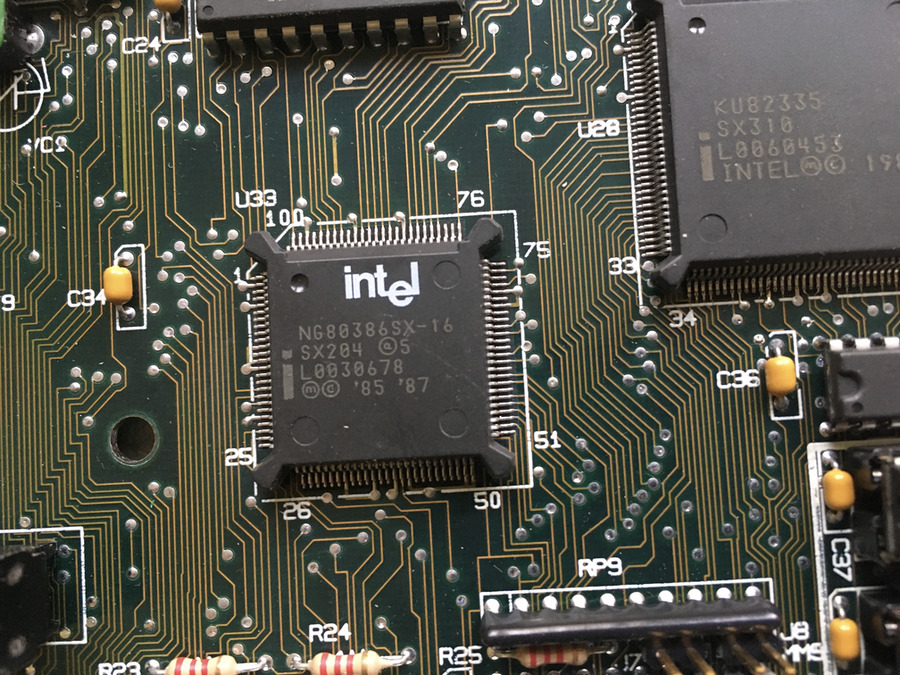
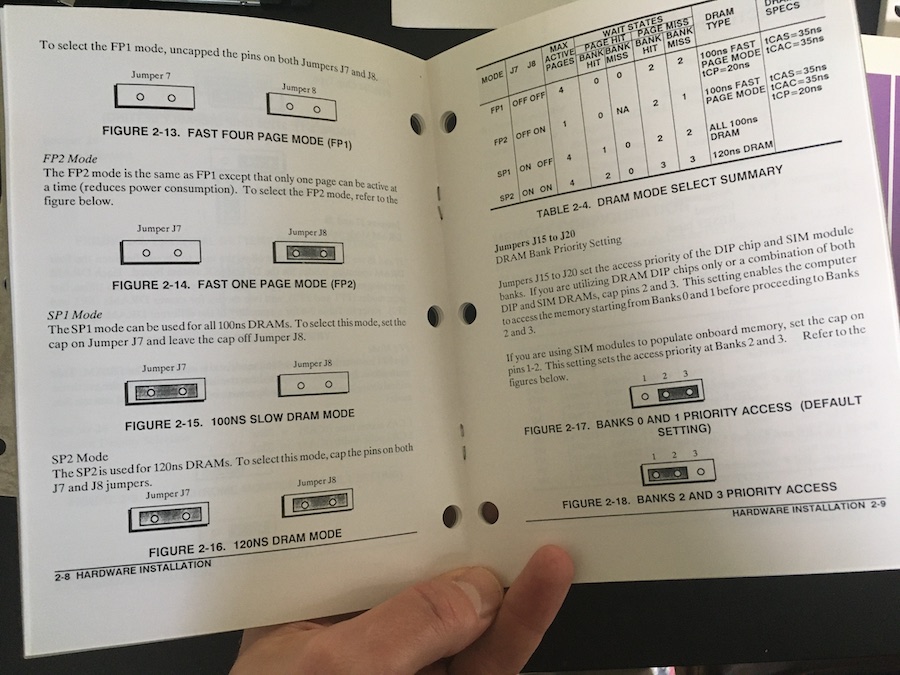
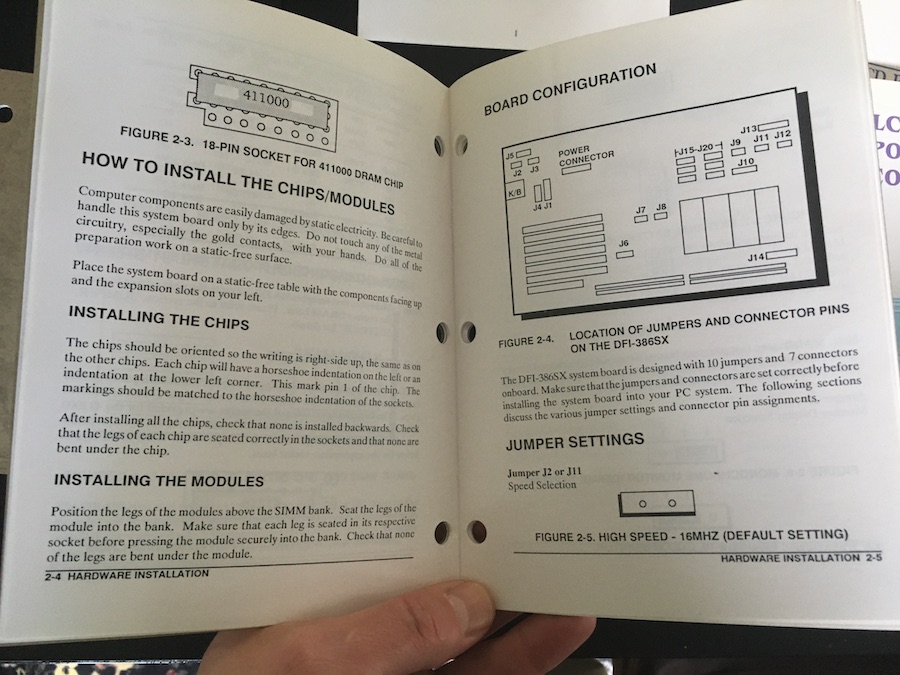
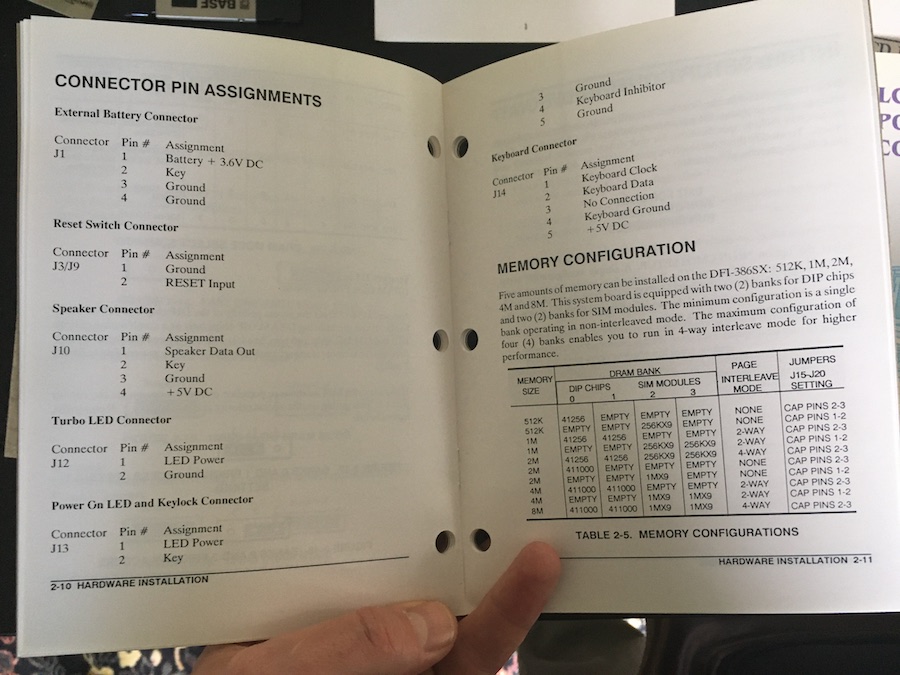
Finally, we get to the real pain in the ass, the debugging of potentially one or more bad RAM chips. As it happens, this computer has four slots for SIMM-type RAM (which looks more like later-era computer RAM) and two banks of eighteen DIP-style RAM chips, each of which has eighteen pins. There are also six motherboard jumpers that are all placed in one of two positions based on which RAM banks are filled, and there is a certain order to which ones can be left empty. All slots of all types were filled and the jumpers were set for this, indicating that it probably has the maximum RAM allowed, 8MB.
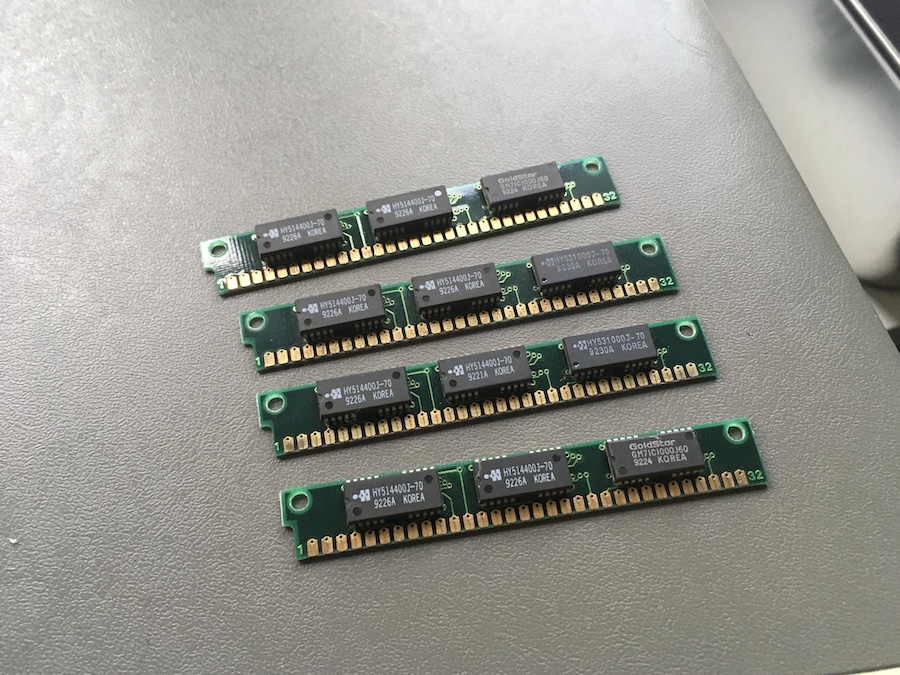
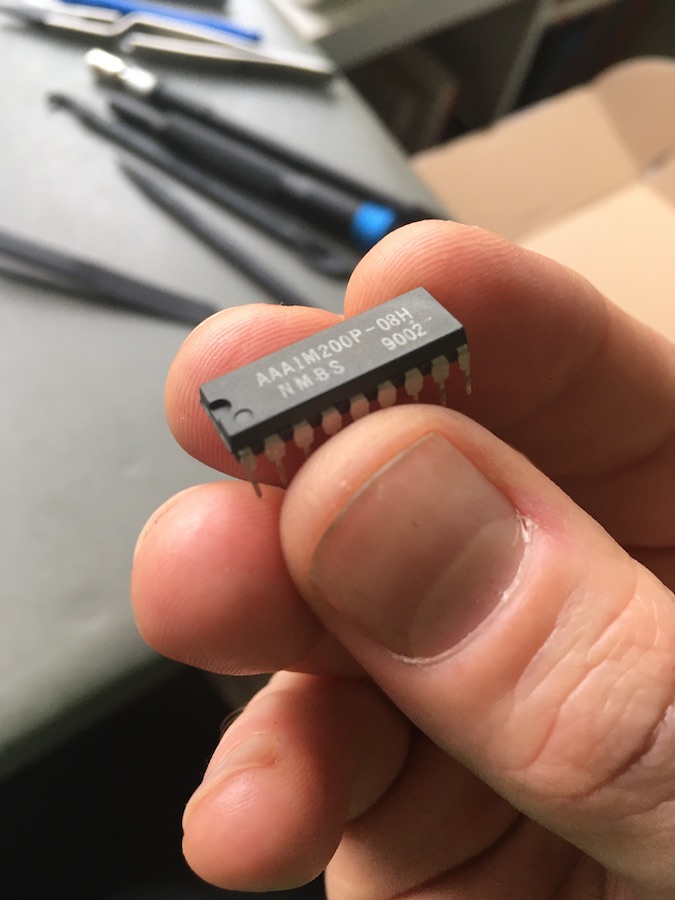
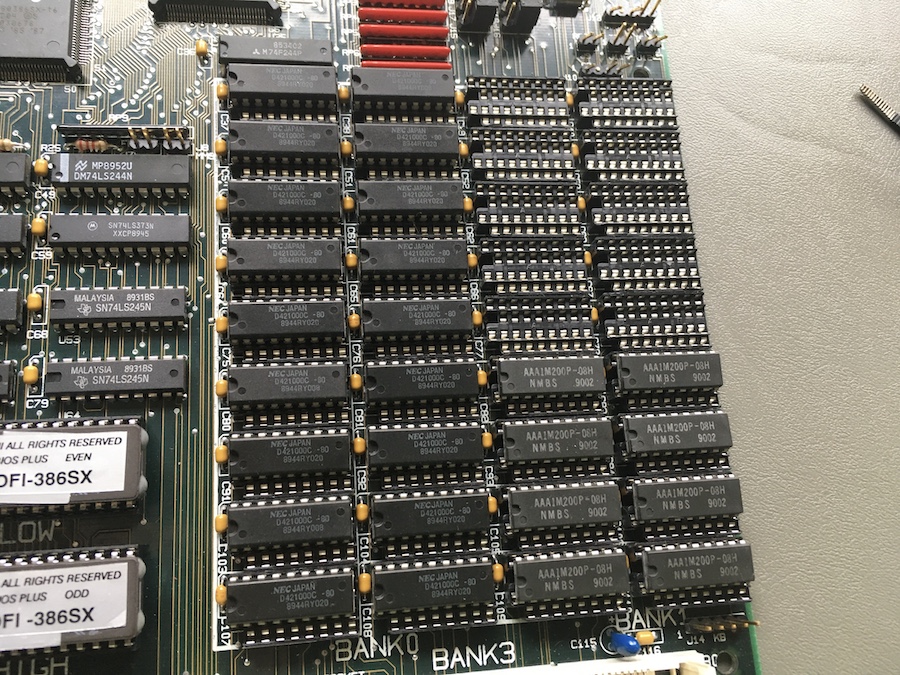
Needless to say, without the motherboard documentation, this would have been very difficult to figure out in the first place, let alone test against. This gave me the confidence to proceed with taking out the 36 DIP chips during the testing, which I have yet to put back in in any configuration. First I tested removing the four easily-pulled SIMMs (meaning the computer should have 4MB left), then I removed half of the DIPs (meaning 2MB left) and then I removed the last 2MB. At that point, I could at least get things to not beep, but still no picture, and no beep likely means no CPU working. Lastly, I replaced the four SIMMs since they were easier (meaning back up to 4MB) and then tried various combinations of two of them (meaning 2MB) to see if any combination worked. While I haven’t been exhaustive (and likely will need to, or possibly get some known-good RAM from someplace else to test with), I’ve at least ruled out that any single bank of RAM is working. Again, this might not be the root problem, but it seems that from reading online, having the DIPs go bad is not uncommon over time.
One cool thing about this, and part of what appeals to me about this era of technology, much like my 1985 VW van, is that the RAM is visible and tangible in a way that modern micro-scale tech is not. I have built rudimentary circuits using similar chips and have an understanding of how data can be stored in them, so doing things at this scale (albeit a repetitive 36 chips in a big area) is something that I can more easily get my head around than, say, looking inside my iPhone. In short, I really like 80s tech’s scale.
Where to next?
The saving grace in this project has been the amount of print material that came with the computer, which has helped tremendously. Both in that I was able to get my bearings on what the variables to the project are, but beyond that, there seems to be a dearth of this sort of info available on the web, at least in a way that I can find it (a notable exception being this nice reference). Lots of info about modern beeps and bad RAM; not so much about the late 80s stuff. I’m looking forward to scanning all of this stuff and putting it online at some point for others as a resource.
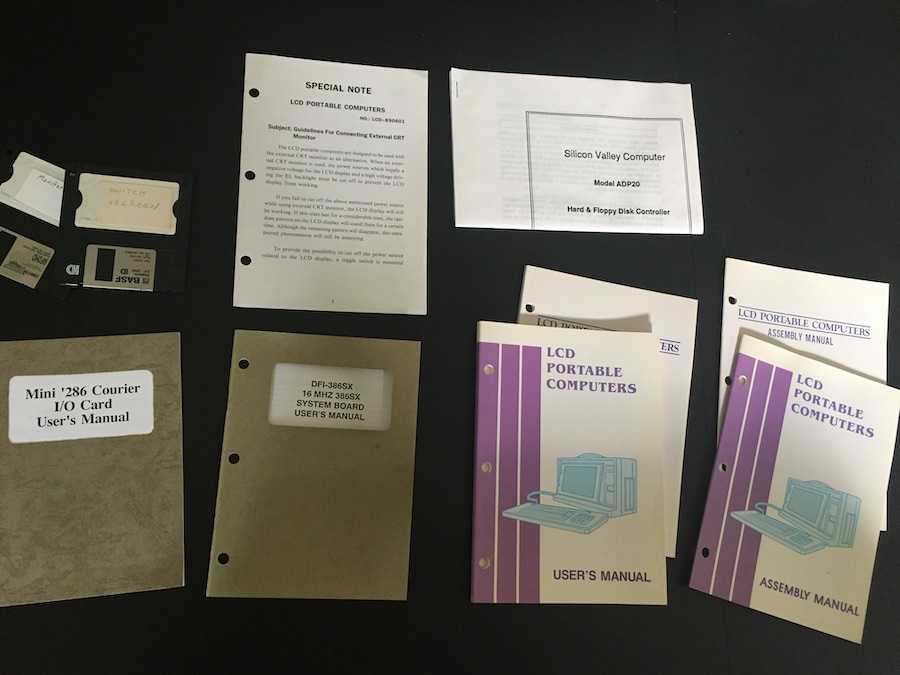
I can’t even imagine where I’d be without this stuff.
I’m also very thankful that a couple 3.5" floppies were included, as sourcing one of those right now during quarantine times and would be a lot trickier. I was able to backup both of them using my FreeBSD machine and then turn one into a FreeDOS boot disk, just as a debugging tool (which I’ve of course not gotten to boot yet either).
Some other nice posts online getting me roughly in the neighborhood of what I’ve needed to know have been:
-
This post on building the ideal 386 designed for performance
-
A YouTube video on building a 386 with modern parts that showed me that it was ok to create your own Frankenstein BIOS battery
-
Another post that I can’t find now about building a little protoboard onto one of the expansion card rear covers that similarly supplies a coin cell battery to the BIOS headers
-
Probably the best tangentially-related post I’ve found to this piece of hardware is this lovely imgur thread on discovering a secret 386 inside of an innocuous wireless device, running permanently off of a floppy! Amazing.
I’m not sure where to head next. One thing that does seem clear, though, is that I need a better and more reliable tabletop setup for debugging, since I am frequently pulling the motherboard in and out of the case in order to get it, the power supply, the video card, the speaker wiring, and the front panel LCD cable aligned properly, all while staying safe from static electricity to the components.
More in a future dispatch!